Design A Space Around THIS: Modern Bedroom and Color of the Year


Design A Space Around THIS: Playful Modern Bedroom

Playful modern bedroom design concept.

I have had the opportunity to visit several homes of the Mid Century Modern style, which I admire, built around the 1930s. The private bedrooms in these homes I always found very interesting to explore. In homes such as those designed by Frank Lloyd Wright, the bedrooms always felt very private and removed from the rest of the home, even hidden away to limit disturbances. The furniture would often be built-in or custom made for the owners with lots of concealed storage. The clean lines and limited clutter defined the look and function of furnishings in this era and serve as the inspiration for the modern styled bedroom.

For this edition of “Design A Space Around THIS” I chose a stylish piece by furniture designer Vladimir Kagan as my muse for a Modern bedroom design. The duo of nightstands made from cherry wood reflect the pure craft of Kagan’s Mid Century modern furniture style. Learn more about Kagan as a designer at vladimirkagan.com.

On a side note: As soon as I found out about the Pantone’s Color of the Year – Marsala – I knew right away to integrate it as the accent color. The “hearty, yet stylish tone is universally appealing and translates easily to fashion, beauty, industrial design, home furnishings and interiors” as described by Pantone, the official color authority. A perfect fit for this modern bedroom design.


What are your thoughts on the 2015 Color of the Year?

Changing Spaces

It’s refreshing to change up your interior space on a regular basis, whether to organize, prepare for company, or for a more permanent change like welcoming a new member to your family. I’ve recapped room specific tips that J Parker McCollum featured during our class “Changing Spaces”. Jan and I hosted the session at Home Repair Services where we engaged with low income families in the Grand Rapids community to discuss practical and budget-friendly interior design improvements. Check our additional link to learn how to make the “DIY: Gallery Wall” from the class.

Entries:

– Make welcoming: it is the transition between
outside and in. Have a space for guest’s items.
– Enter rooms at the long end or on a diagonal
to make them seem larger.
– Lower ceilings in the entry and hallways makes
entering rooms feel taller and more comfortable.

Living Spaces:

Create zones within a large or odd shaped room for different activities.

Create zones within a large or odd shaped room for different activities.

– Separate into different activity zones.
– Add a workspace nook.
– Use multi-function pieces.
– Try not using the TV as a focal point.

Kitchens:

– Paint cabinets or add new hardware.
– Change out counter tops.
– Replace cabinets with open shelving.
– Update back splash.
– Get lighting where you need it.

Bathrooms:

– Add cabinets to spaces above vanity
and toilet for additional storage.
– Invest in new handles.
– Try a larger mirror or two separate
mirrors.
– Use a glass glaze kit to add privacy
to windows.
– Avoid using green and blue wall color:
they will make your reflection appear
washed out.

Bedrooms:

Facing the bed along the window wall allowed for better movement through the room into the adjacent master bath.

Face the bed along the window wall for better movement through the room into the adjacent bath.

– Face the bed along a different wall.
– New bed pillow covers instead of
purchasing a whole new bed set.
– Install dual bed lamps to layer light
and for late night reading.
– Make a headboard from scratch.
– Add a bench at the end of the bed
for dressing and additional storage.

In general areas keep these key points in mind:

– Hide wires with furniture or cabinets.
– Don’t be afraid to use color and pattern.

– Go “Green” by re-purposing, refinishing and buying used.
– Plan home organization as whole; not
just room by room. You will find you have
more space than you thought!

DIY: Gallery Wall

Changing Spaces                    DO IT YOURSELF GALLERY WALL

Project Checklist


Demonstrating the DIY gallery wall.

Demonstrating the DIY gallery wall.

Art, empty frames, and... bed springs combine to create a DIY gallery wall.

Art, empty frames, and… bed springs combine to create a DIY gallery wall.

Before beginning make sure you choose a well ventilated area for the project. Be sure to cover surfaces with a drop cloth prior to painting to avoid damage.


  1. Purchase frames or shelving from local second-hand stores. Choose a variety of shapes and sizes. Finding a frame with decorative details will really stand out once painted.
  2. Carefully remove backing with a screwdriver or sharp knife if a paper backing. Some frames may require pliers to open. Remove the picture and glass and set aside leaving only the surrounding frame.
  3. Clean frames with a damp towel to remove any dirt and let dry.
  4. Using a medium grain sandpaper, lightly sand the front and sides of the frame or shelving to prepare for priming.
  5. Remove any extra dust from sanding by rubbing down the frame with a damp towel. Let dry.
  6. Protect surfaces and set down a drop cloth in area you plan to work.
  7. Using a wide paint brush apply a white water-based acrylic gesso primer, coat all surfaces of the frame or shelf that will be visible when mounted. Let dry for at least 20 minutes.
    1. Note: Oil-based primers should not be used. If using any oil-based paint never wash your hands or brushes in the sink. Turpentine is necessary for cleaning.
  8. Repeat applying gesso primer if more coverage is desired before painting. Wash hands and brush with warm soapy water.
  9. Once completely dry, allow at least 2 hours, you can begin painting.
    1. You may apply a high gloss paint in any color of your choosing to the frame.
    2. Or spray paint frames in a well ventilated area away from anything that could get damaged. You can create a spray box using a large box open on one side to capture any residual paint from spraying. Be sure to always wear a mask that covers your mouth and nose and goggles when spray painting.
  10. Let dry, repeat coats until full coverage is achieved.
  11. Take a large sheet of construction paper (or even several sheets of newspaper taped together) the size of the display area and lay down on the ground to start arranging frames on.
    1. Compose your design considering balance of positive and negative space, symmetry, surrounding furniture nearby, and create a focal point.
    2. Trace around each frame on the paper once finished arranging.
    3. Mark where mounting holes would need to be placed for each frame on the paper.
  12. Tape paper on wall where the display will be.
  13. With a hammer and nails, place a nail at each marking on the paper for mounting.
  14. Remove construction paper carefully, not to disturb the nails.
  15. Follow the design layout and put the frames up in the correct places.

Design A Space Around THIS: Independence Day

Independence Day is quickly approaching and I’m excited to share some fun and festive finds for the home to show off your red, white, and blue spirit for the upcoming holiday. Watching fireworks requires the transition from celebrating indoors to outdoors and I’ve included furnishings and accessories for both the home and patio.

Add patriotic charm to your home year round by combining the red, white, and blue.

Add patriotic charm to your home year round by combining the red, white, and blue.

Find these items and more on our Pinterest July 4 Décor board!

My best July 4th memories are from spending the day annually at my Grandparents’ cottage in Michigan when I was young. Family from as far as California would come early and spend the day indoors and out prepping and grilling, enjoying good conversation, and taking a swim in the lake to cool off (no air conditioning even after all these years). The evening would be capped off with some of the best fireworks I can remember lighting up the lake. Aside from the mosquito bites and a few burned fingers some of the years, it was always a celebration to look forward to.

How will you be sharing your American pride this 4th of July weekend?


Design A Space Around THIS: Vistosi Ceiling Pendant

At 20 inches in diameter and 36 inches high, the stunning Vistosi blown glass and nickel pendant designed by Gino Vistosi would create a strong presence in any interior setting. For this edition of ‘Design A Space Around THIS’, I’ve placed the Vistosi pendant in a dining room setting evoking an American retro glam style of the 1970s, when this pendant was produced.

Vistosi pendant featured in dining room setting.

Vistosi pendant featured in dining room setting.


Emphasis on the Vistrosi pendant is created using a variety of pieces with delicate lines to contrast the large scale curvilinear form of the pendant. Pattern and texture is also kept to a minimum allowing the shape of each piece to stand out. Color, line and form are balanced to create a unified setting focused on the pendant.

Typically it’s considered against the rules to use blues in a dining setting because color psychology tells us these hues can evoke a lack of appetite. Within this space design, I’ve integrated grayed-out midnight blue tones with warm wood and nickel accents to complement the pendant, steering away from the stereotypical yellow and orange mod colors of the era. The result is a dramatic glam look that doesn’t harm the appetite.

Do you follow the guidelines of color psychology in your home?

Design A Space Around THIS: Radiant Orchid

Global color authority, Pantone, announced the Color of the Year for 2014 as Radiant Orchid. A subtle pinkish purple, Radiant Orchid is described as “a captivating, magical, enigmatic purple”. Curious how you can add a touch of this dazzling color to your interior space? Read on, and check out some examples on the J Parker McCollum Pinterest Color Trends board!

1. Accessorize with this expressive hue using accent pillows or a soft throw.
2. Pair vibrant accent pieces with neutrals for a ‘wow’ factor.
3. Swap out the shade on a tired looking lamp.
4. A vase in this color awaits spring flowers.
5. Wall décor, art and mirrors catch the eye in this jewel hue.
6. Roll out a royal rug under foot and furnishings.
7. Create an accent wall and a new focal point with paint or a bold wall covering.
8. Brighten up a place setting with flowers in a vase or patterned napkins.

Color board for the 2014 trend.

Color board for the 2014 trend.

What are your thoughts on Radiant Orchid as the color trend of 2014?

Sophisticated Outdoor Spaces

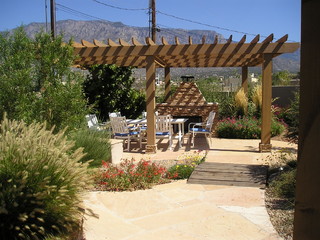
Out here in Arizona if you ask homeowners what their favorite room is in the house, they’ll often say it is their outdoor living space. Outdoor living spaces are a way of enjoying the natural vistas and beautiful weather we have in Arizona without leaving the comfort and amenities of home. Enclosed by lush foliage or a privacy divider, these retreats are an extension of the home in the Southwest; connecting indoor and outdoor living.

Just as an Interior Designer would evaluate an interior room, the key to outdoor spaces is to consider who will be using the space and how it will be used. What are the main activities that will take place? Will it be a place of solitude or a hub for casual entertaining? Considering exterior architecture and scenic views that can be highlighted in the setting will make the most of your outdoor experience.

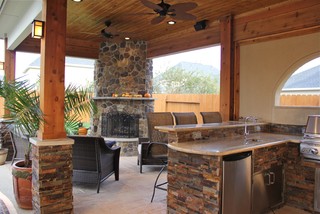
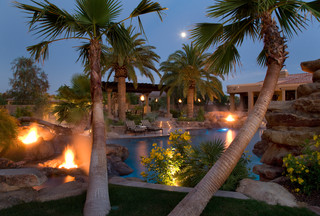
COMFORT: In the heat of summer, shade is necessary to keep outdoor spaces pleasant. In the cooler months, outdoor fireplaces allow year round enjoyment. Fireplaces, a traditional Southwestern element, can serve as the focal point for an intimate gathering any time of year.

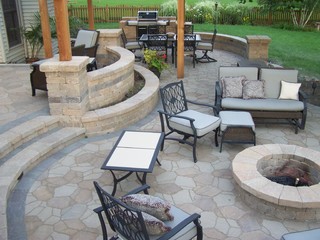
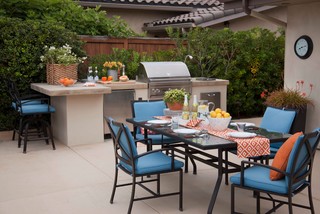
ACTIVITIES: Cooking and grilling outside during the warmer months means less strain on that overworked air conditioner. Create zones with a food prep station, dining area, relaxed seating and play area and spend all day outside. Cook outdoors a lot? The luxury of outdoor kitchens are gaining popularity as the indoor kitchen is a common place for gathering in many homes.

SEATING: Furniture suitable for indoor/outdoor use comes in a variety of styles to suit any taste. Vary the seating type with the zone it will be used in to distinguish and add visual interest. Durable and easy to clean upholstery for outdoor use is a must.

DECOR: Dress up your deck or patio with colorful linens, trays, dinnerware, planters remind you of the excitement of summer. Monochromatic palettes are better suited for a serene and relaxing atmosphere. Bring the comfort of home outside by integrating area rugs, pillows, sculptural art, consoles and mirrors.

AMBIANCE: The party doesn’t have to go back inside after the sun sets. Low level solar lighting keeps the fun going late and doesn’t interrupt views of the evening stars. Lanterns and string lighting can achieve the same glow.

The soothing sounds of a fountain or waterfall add ambiance or their own or integrated in a pool. Use with natural building materials to create harmony with outdoor surroundings.

Stunning landscapes at the Arizona Sonora Desert Museum in Tucson, AZ.

Stunning landscapes seen visiting at the Arizona Sonora Desert Museum in Tucson, AZ.

NATURE: No outdoor space is complete without some natural landscaping based on the contours of the land. Consider variety, color, and groupings to add definition to your garden or landscape.

Click on our ‘Patios and Decks Ideabook’ above on HOUZZ for more inspiration! There’s still time in the season to create and enjoy a beautiful outdoor living space. What do you look forward to integrating in your own backyard, patio, deck or garden to connect the indoors and outdoors?

Design a Space Around THIS: Pantonova Chaise

For our first round of ‘Design a Space Around THIS’ the inspiration piece is a Pantonova chaise lounge and stool by innovative Denmark designer Verner-Panton for Fritz-Hansen in 1971.  A detailed chrome wire open base supports the curvilinear modern leather lounger.

We imagined a Ranch style home setting with modern furnishings for the vignette. The color palette and art inspired by animals: the horse and zebra. High ceilings, orientation around the hearth, plank floors and rustic architectural elements of ranch style interiors are juxtaposed with modern forms, clean lines and smooth textures in the furnishings and fixtures.

Modern ranch style interior inspired by the Pantonova Chaise.

Modern ranch style interior inspired by the Pantonova Chaise.

Do you have an inspiration piece you would like to see on “Design a Space Around THIS”? Let us know:

www.jparkermccollum.com